ssh-keygen -t rsa

#################

Generating public/private rsa key pair.
Enter file in which to save the key (/home/user/.ssh/id_rsa): linuxwin_rsa_key
Enter passphrase (empty for no passphrase):*******
Enter same passphrase again:*******
Your identification has been saved in linuxwin_rsa_key
Your public key has been saved in linuxwin_rsa_key.pub
The key fingerprint is:
SHA256:/nnU**********************hu2c user@servername
The key's randomart image is:
+---[RSA 3072]----+
|        8===o    |
|      0++++___   |
|             =.o |
|             ...+|
|        ++++++o+o|
|       .    *****|
|        . *****  |
|        *****    |
|                 |
+----[SHA256]-----+
Install public key on the server
ssh-copy-id -i linuxwin_rsa_key.pub user@server
or just copy it to ~/.ssh/authorized_keys
cp linuxwin_rsa_key.pub ~/.ssh/authorized_keys
Use Privete key with ssh client, mobaXterm, PuTTy…etc
Download files larger then one gigabyte with any browser can be very frustrating as browsers can’t download files much larger then one gigabyte.
SSH to your server and execute this command:
plesk sbin pmm-ras --get-dump-list | grep message | sed -E 's/<message>//g' | sed -E 's/\:\ <\/message>//'

### it will reply with a list of available backups ###

domains/linuxwin.com/backup_info_2411141750.xml

### if you have multiple sites and backups it will be longer list ###
Insert .xml file in the following command to make backup file that you can download via FTP, SFTP…
V – selects entire lines v – selects range of text ctrl-v – selects columns
gv – reselect block
Text Entry Commands (Used to start text entry)
a Append text following current cursor position A Append text to the end of current line i Insert text before the current cursor position I Insert text at the beginning of the cursor line o Open up a new line following the current line and add text there O Open up a new line in front of the current line and add text there
h Moves the cursor one character to the left l Moves the cursor one character to the right k Moves the cursor up one line j Moves the cursor down one line
nG or :n Cursor goes to the specified (n) line (ex. 10G goes to line 10) ^F (CTRl F) Forward screenful ^B Backward screenful ^f One page forward ^b One page backward ^U Up half screenful ^D Down half screenful
$ Move cursor to the end of current line 0 (zero) Move cursor to the beginning of current line w Forward one word b Backward one word
Exit Commands
:wq Write file to disk and quit the editor :q! Quit (no warning) :q Quit (a warning is printed if a modified file has not been saved) ZZ Save workspace and quit the editor (same as :wq)
: 10,25 w temp write lines 10 through 25 into file named temp. Of course, other line numbers can be used. (Use :f to find out the line numbers you want.
Text Deletion Commands
x Delete character dw Delete word from cursor on db Delete word backward dd Delete line d$ Delete to end of line d^ (d caret, not CTRL d) Delete to beginning of line
Yank (has most of the options of delete)– VI’s copy commmand
yy yank current line y$ yank to end of current line from cursor yw yank from cursor to end of current word 5yy yank, for example, 5 lines
Paste (used after delete or yank to recover lines.)
p paste below cursor P paste above cursor “2p paste from buffer 2 (there are 9) u Undo last change U Restore line J Join next line down to the end of the current line
File Manipulation Commands
:w Write workspace to original file
:w file Write workspace to named file :e file Start editing a new file :r file Read contents of a file to the workspace
To create a page break, while in the insert mode, press the CTRL key
And l. ^L will appear in your text and will cause the printer to start
Most commands can be repeated n times by typing a number, n, before
the command. For example 10dd means delete 10 lines.
. Repeat last command cw Change current word to a new word r Replace one character at the cursor position R Begin overstrike or replace mode use ESC key to exit
:/ pattern Search forward for the pattern 😕 pattern Search backward for the pattern n (used after either of the 2 search commands above to continue to find next occurrence of the pattern. :g/pat1/s//pat2/g replace every occurrence of pattern1 (pat1) with pat2
Example :g/tIO/s//Ada.Text_IO/g
This will find and replace tIO by Ada.text_IO everywhere in the file. :g/a/s// /g replace the letter a, by blank :g/a/s///g replace a by nothing
note: Even this command be undone by u
It is super small computer (credit card size) running on version of Debian linux called Raspbian. It is ideal for home server, and control of your home devices such as cameras, printers,etc… In case your provider gave you the router without VPN support (which is my case) it is the perfect way to make your own VPN server.
As Apple has removed PPTP from IOS 10, L2TP + IPsec is one of the options. Here is my config that works perfectly on my iPhone and iPad. Raspberry Pi runs Raspbian Jessie.
(This setup should be the same on all linux platforms)
1. Forward udp ports 500 and 4500 on your router. You can also put your Pi in DMZ, so all ports will be exposed to internet.
2. Install openswan
apt-get install xl2tpd openswan ppp lsof
Note: Answer NO when asked if an X.509 certificate for this host can be automatically created or imported. This certificate can be created and imported later using:
echo “net.ipv4.ip_forward = 1” | tee -a /etc/sysctl.conf
echo “net.ipv4.conf.all.accept_redirects = 0” | tee -a /etc/sysctl.conf
echo “net.ipv4.conf.all.send_redirects = 0” | tee -a /etc/sysctl.conf
for vpn in /proc/sys/net/ipv4/conf/*; do echo 0 > $vpn/accept_redirects; echo 0 > $vpn/send_redirects; done
sysctl -p
Add this code to /etc/rc.local
for vpn in /proc/sys/net/ipv4/conf/*; do echo 0 > $vpn/accept_redirects; echo 0 > $vpn/send_redirects; done

iptables --table nat --append POSTROUTING --jump MASQUERADE
5. /etc/ipsec.conf
This is whole config. Just replace 192.168.0.166 to your IP and 192.168.0.1 to your router IP
version 2.0
config setup
nat_traversal=yes
protostack=netkey
virtual_private=%v4:192.168.0.0/16,%v4:10.0.0.0/8,%v4:172.16.0.0/12,%v4:25.0.0.0/8,%v4:!10.25$
oe=off
plutodebug=all
plutostderrlog=/var/log/openswan.log
conn L2TP-PSK-NAT
rightsubnet=vhost:%priv
also=L2TP-PSK-noNAT
conn L2TP-PSK-noNAT
authby=secret
pfs=no
auto=add
keyingtries=3

# we cannot rekey for %any, let client rekey
rekey=no

# Apple iOS doesn't send delete notify so we need dead peer detection
# to detect vanishing clients

dpddelay=30
dpdtimeout=120
dpdaction=clear

# Set ikelifetime and keylife to same defaults windows has

ikelifetime=8h
keylife=1h

# l2tp-over-ipsec is transport mode
type=transport
#
left=192.168.0.166
#
# For updated Windows 2000/XP clients,
# to support old clients as well, use leftprotoport=17/%any
leftprotoport=17/%any
#
# The remote user.
#
right=%any
# Using the magic port of "%any" means "any one single port". This is
# a work around required for Apple OSX clients that use a randomly
# high port.
rightprotoport=17/%any
#force all to be nat'ed. because of ios
forceencaps=yes

# Normally, KLIPS drops all plaintext traffic from IP's it has a crypted
# connection with. With L2TP clients behind NAT, that's not really what
# you want. The connection below allows both l2tp/ipsec and plaintext
# connections from behind the same NAT router.
# The l2tpd use a leftprotoport, so they are more specific and will be used
# first. Then, packets for the host on different ports and protocols (eg ssh)
# will match this passthrough conn.

conn passthrough-for-non-l2tp
type=passthrough
left=192.168.0.166
leftnexthop=192.168.0.1
right=0.0.0.0
rightsubnet=0.0.0.0/0

auto=route
6. /etc/ipsec.secrets
Just put your IP address and your secret here.
include /var/lib/openswan/ipsec.secrets.inc
192.168.0.166 %any: PSK "your_password_here"
7. /etc/xl2tpd/xl2tpd.conf
Put your IP here and set range that will not conflict with your router dhcp
[global]
ipsec saref = yes
listen-addr = 192.168.0.166
[lns default]
ip range = 192.168.0.201-192.168.0.250
local ip = 192.168.0.166
assign ip = yes
require chap = yes
refuse pap = yes
require authentication = yes
name = linkVPN
ppp debug = yes
pppoptfile = /etc/ppp/options.xl2tpd
length bit = yes
# Secrets for authentication using CHAP
# client server secret IP addresses
username * password *
10. Restart the service
/etc/init.d/xl2tpd restart
/etc/init.d/ipsec restart
And that is it. Make sure your VPN server starts on boot:
update-rc.d -f ipsec remove
update-rc.d ipsec defaults
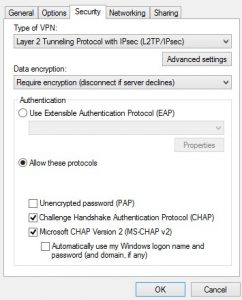
Chose MS-Chap v2 when connecting
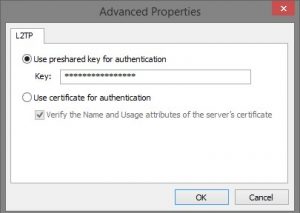
And put your IPsec secret here
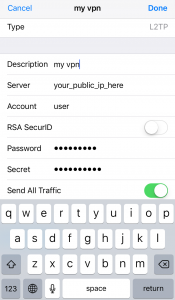
On IOS 10
Important
Windows does not support IPsec NAT-T by default, which is used whenever the server is behind a NAT (as in this case). You have to add a registry key to enable this.
On your Windows Vista, 7 or 8 client machine change or add the following registry item:
HKEY_LOCAL_MACHINE\SYSTEM\CurrentControlSet\Services\PolicyAgent\

New DWORD (32-bit) Value:AssumeUDPEncapsulationContextOnSendRule
Set the value to 2
This allows the client or server to be behind a NAT firewall.