OpenVPN server (debian,ubuntu,kali,raspberry pi) + IOS13 – IOS16 … IOS26 client
Update: this is still working on December 2023 with IOS16
Update: ….still working! April 2026with IOS26
apt install openvpn easy-rsa
cp -r /usr/share/easy-rsa /etc/openvpn/
cd /etc/openvpn/easy-rsa
vim vars
/etc/openvpn/vars content
export KEY_COUNTRY="Serbia"
export KEY_PROVINCE="RS"
export KEY_CITY="Belgrade"
export KEY_ORG="LinuxWin"
export KEY_EMAIL="[email protected]"
export KEY_OU="OpenVPN"
Initialize PKI
./easyrsa init-pkiBuild the CA without a password
./easyrsa build-ca nopassGenerate the server key
./easyrsa gen-req server nopassSign the server certificate
./easyrsa sign-req server serverBuild a Diffie-Hellman key exchange
./easyrsa gen-dhGenerate a HMAC signature
openvpn --genkey --secret ta.keyCopy all the certificate and key to the /etc/openvpn
cp ta.key /etc/openvpn/
cp pki/ca.crt /etc/openvpn/
cp pki/private/server.key /etc/openvpn/
cp pki/issued/server.crt /etc/openvpn/
cp pki/dh.pem /etc/openvpn/
Generate Client certificate
./easyrsa gen-req client nopassSign Client certificate
./easyrsa sign-req client clientCopy client certificate and key to /etc/openvpn/client/
cp pki/ca.crt /etc/openvpn/client/
cp pki/issued/client.crt /etc/openvpn/client/
cp pki/private/client.key /etc/openvpn/client/
/etc/openvpn/server.conf file
port 1194
proto udp
dev tun
ca /etc/openvpn/ca.crt
cert /etc/openvpn/server.crt
key /etc/openvpn/server.key  # This file should be kept secret
dh /etc/openvpn/dh.pem
;dh none

server 192.168.10.0 255.255.255.0
push "redirect-gateway def1 bypass-dhcp"
push "dhcp-option DNS 8.8.8.8"
push "dhcp-option DNS 208.67.220.222"
keepalive 10 120

;tls-auth ta.key 0 # This file is secret
tls-crypt /etc/openvpn/ta.key 0

auth SHA256
cipher AES-256-GCM

user nobody
group nogroup
persist-key
persist-tun

tun-mtu 1500

status /var/log/openvpn/openvpn-status.log
log         /var/log/openvpn/openvpn.log
log-append  /var/log/openvpn/openvpn.log
verb 3
explicit-exit-notify 1
enable IP forwarding
vim /etc/sysctl.conf
###uncoment following line###
net.ipv4.ip_forward=1

###save and exit###
sysctl -p

### the other way is to do the same ###
echo 1 > /proc/sys/net/ipv4/ip_forward
Firewall rules
### for server behind NAT ###
iptables -t nat -A POSTROUTING -o eth0 -j MASQUERADE
### or just...###
iptables -t nat -A POSTROUTING -j MASQUERADE

### open udp port 1194 ###
iptables -A INPUT -i eth0 -m state --state NEW -p udp --dport 1194 -j ACCEPT

### allow TUN interface ###
iptables -A INPUT -i tun0 -j ACCEPT
iptables -A FORWARD -i tun0 -j ACCEPT
To save rules to be loaded on boot install iptables-persistent
sudo apt install iptables-persistent

### current iptables rules will be saved to the
### /etc/iptables/rules.v4
### /etc/iptables/rules.v6
Start OpenVPN server service
systemctl start openvpn@server

### check status with..###
systemctl status openvpn@server
.ovpn config file for ios
client
dev tun
proto udp          ####tcp if you use tcp protocol
remote 192.168.100.55   ### your server ip address or domain
port 1194     ####1194 only if your vpn server's port is the default port
resolv-retry infinite
nobind
persist-key
persist-tun

tun-mtu 1500
;link-mtu 1549
mssfix 1300

auth SHA256
;auth-user-pass
verb 5
;comp-lzo  ###(disable compression)
remote-cert-tls server
cipher AES-256-GCM

redirect-gateway def1
;remote-gateway 192.168.6.1
;dhcp-options DNS .8.8.8.8

;route 192.168.6.0 255.255.255.0 192.168.6.1


<ca>
ca.crt  ### copy content here ###
</ca>

<cert>
clinet.ctr  ### copy content here ###
</cert>

<key>
client.key ### copy content here ###
</key>

<tls-crypt>
ta.key   ### copy contet of ta.key here ###
</tls-crypt>
Import .ovpn config file to ios via itunes, mail, google drive, onedrive…
There is a little script I made to automate this last step, (generate config file with all certificates). OVPNconfig
And for make certifictes and config file for more users you can use this script: OVPNclient
Update: renew server cert
cd /etc/openvpn/easy-rsa
./easyrsa gen-req server nopass
./easyrsa sign-req server server

sudo cp pki/issued/server.crt /etc/openvpn/
sudo cp pki/private/server.key /etc/openvpn/

sudo systemctl restart openvpn@server
To check cert expiration dates
openssl x509 -in /etc/openvpn/server/server.crt -noout -dates

openssl x509 -in /etc/openvpn/easy-rsa/pki/issued/client1.crt -noout -dates

openssl x509 -in /etc/openvpn/easy-rsa/pki/ca.crt -noout -dates
OpenVPN server on Mikrotik with IOS13 client
Mikrotik OS6.47
Generate a Self-Signed CA certificate
/certificate add name=mt.ca common-name=mt.ca key-usage=key-cert-sign,crl-sign trusted=yes
/certificate sign mt.ca
Generate a certificate for the vpn server (mikrotik router), sign it and trust it.
/certificate add name=ovpn.server common-name=ovpn.server
/certificate sign ovpn.server ca=mt.ca

/certificate set trusted=yes ovpn.server
Generate a certificate for the vpn client (ipad or phone) and sign it.
/certificate add name=iosvpn.client common-name=iosvpn.client
/certificate sign iosvpn.client ca=mt.ca

/certificate set trusted=yes iosvpn.client
Export CA certificate
/certificate export-certificate mt.caExport client certificate to pcks12 file type (required for ios)
/certificate export-certificate iosvpn.client export-passphrase=12345678 type=pkcs12Exported client key pair is now in files with the filename cert_export_iosvpn.client.p12
Import it to OpenVPN connect with iTunes
cert_export_mt.ca.crt
Content of this file has to be placed at the end of .ovpn config file
.ovpn configuration file for IOS
client
dev tun
proto tcp          #### Mikrotik uses TCP only
remote mynetname.net  ### or IP address
port 1194     ####If you use defult port
resolv-retry infinite
nobind
persist-key
persist-tun

tun-mtu 1492
mssfix 1400

auth SHA1
auth-user-pass
verb 5
;comp-lzo  ###(disable compression)
remote-cert-tls server
cipher AES-256-CBC

redirect-gateway def1   ### ios wont work without this
;remote-gateway 192.168.6.1
;dhcp-options DNS .8.8.8.8

;route 192.168.6.0 255.255.255.0 192.168.6.1


<ca>
-----BEGIN CERTIFICATE-----

### CONTENT OF mt.ca.crt FILE ###

-----END CERTIFICATE-----
</ca>
Save as iosclient.ovpn and import to OpenVPN connect on ios
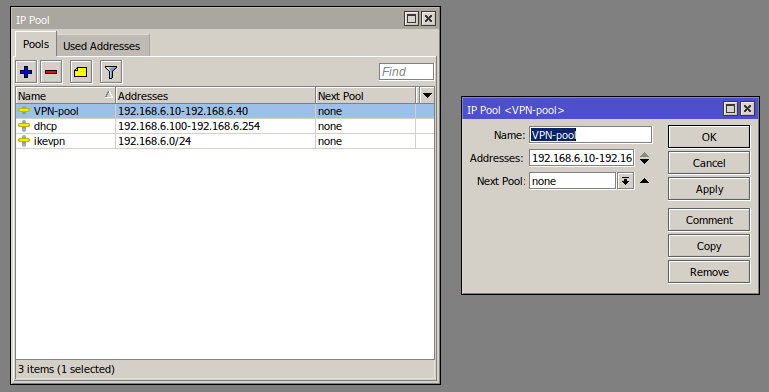
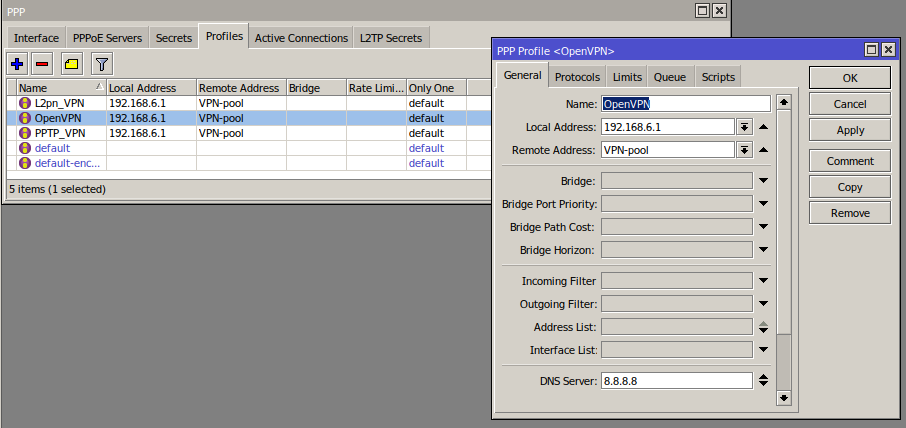
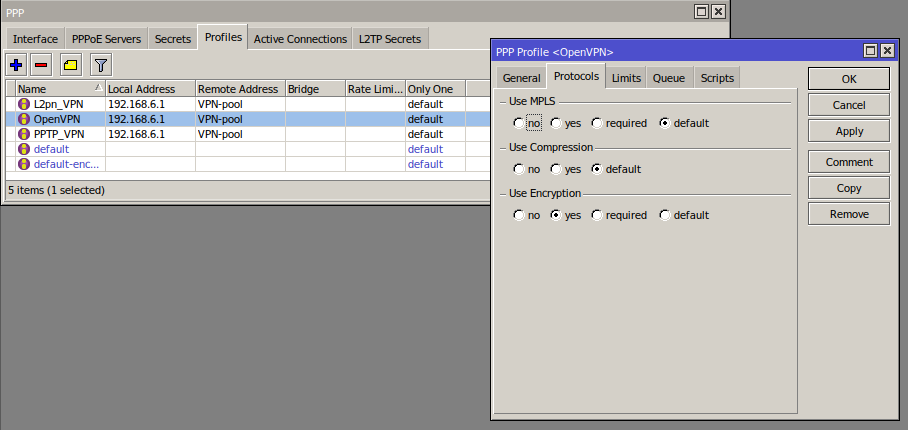
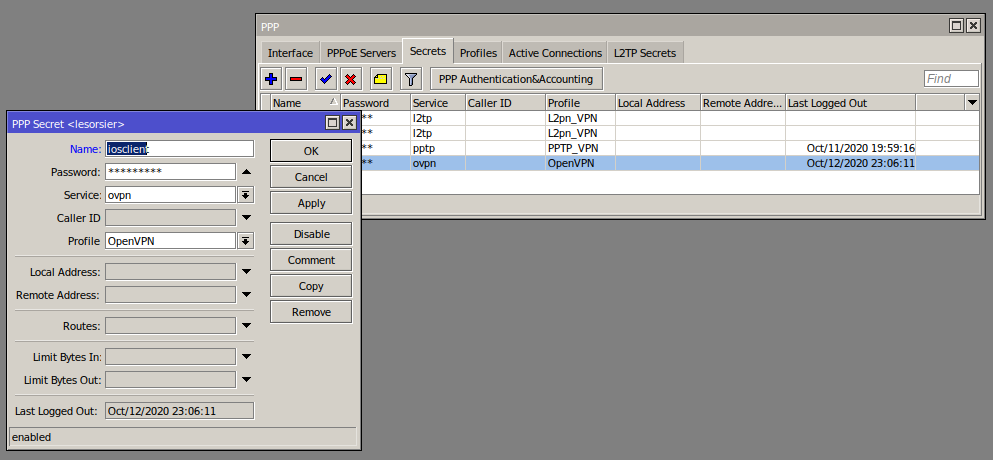
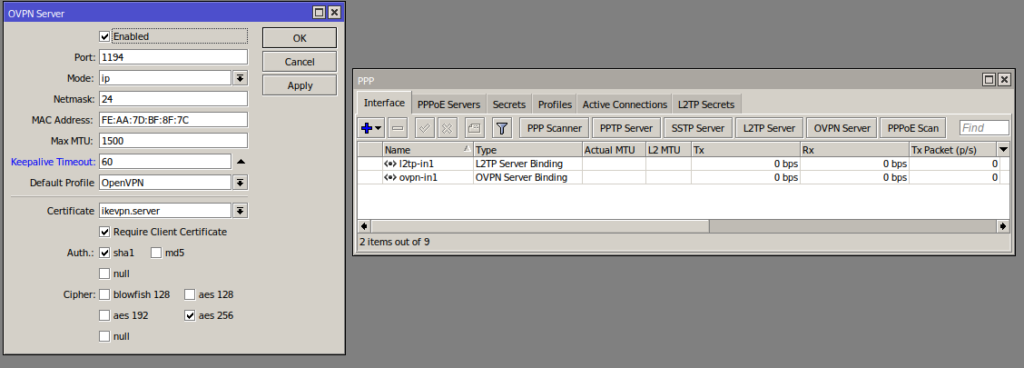
Mikrotik OpenVPM server config
/ip/pool
/ppp/profile
/ppp/secrets
/ppp
Open TCP port 1194 on firewall
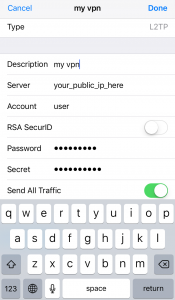
/ip firewall filter add action=accept chain=input comment="allow OpenVPN" disabled=no dst-port=1194 protocol=tcpL2TP + IPsec VPN on Mikrotik router (IOS 10 support)
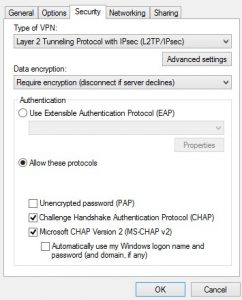
PPTP is not supported anymore by Apple. In order to connect to your vpn with iPhone or iPad you have to use different protocol.
This is how to do it on Mikrotik router.
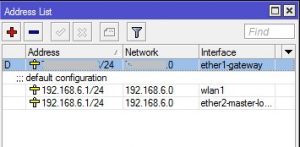
1. IP > Addresses
Assign IP addresses for each interface, public on ether1-gateway and private on ether2.
2. IP > Pool
Set range of IP addresses for your remote devices.
192.168.16.10-192.168.16.20 for example.

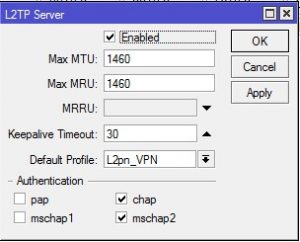
3. PPP > Interface – Enable L2TP Server
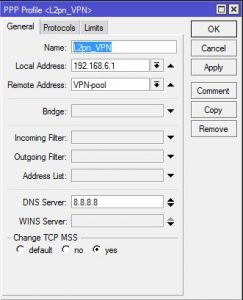
4. PPP > Profiles (make one)
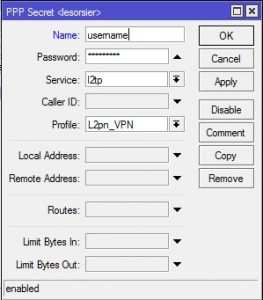
5. PPP > Secrets (set user name and password)
6. IP > IPsec > Peers
(make new peer, set secret)
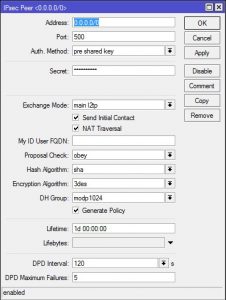
7. IP > IPsec > Proposals

That’s should be all.
Make sure you select MS-CHAP v2 on connecting.
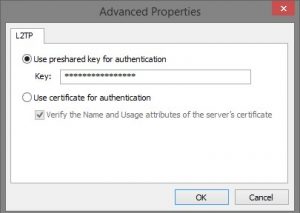
And put your IPsec secret here.
On IOS 10
L2TP + IPsec VPN server on Raspberry Pi (IOS 10 support)
First at all, what is Raspbery Pi?
It is super small computer (credit card size) running on version of Debian linux called Raspbian. It is ideal for home server, and control of your home devices such as cameras, printers,etc… In case your provider gave you the router without VPN support (which is my case) it is the perfect way to make your own VPN server.
As Apple has removed PPTP from IOS 10, L2TP + IPsec is one of the options. Here is my config that works perfectly on my iPhone and iPad. Raspberry Pi runs Raspbian Jessie.
(This setup should be the same on all linux platforms)
1. Forward udp ports 500 and 4500 on your router. You can also put your Pi in DMZ, so all ports will be exposed to internet.
2. Install openswan
apt-get install xl2tpd openswan ppp lsof
Note: Answer NO when asked if an X.509 certificate for this host can be automatically created or imported. This certificate can be created and imported later using:
dpkg-reconfigure openswan
3. Give your Pi static IP
/etc/dhcpcd.conf
nohook lookup-hostname
interface eth0
static ip_address=192.168.0.166/24
static routers=192.168.0.1
static domain_name_servers=8.8.8.8
192.168.0.166 is my Raspberry Pi ip, and 192.168.0.1 is my router. You have to switch those to your ip addresses.
4. Firewall and IP forwarding
Execute those line by line. You have to be root, or you can use sudo.
iptables –table nat –append POSTROUTING –jump MASQUERADE
echo “net.ipv4.ip_forward = 1” | tee -a /etc/sysctl.conf
echo “net.ipv4.conf.all.accept_redirects = 0” | tee -a /etc/sysctl.conf
echo “net.ipv4.conf.all.send_redirects = 0” | tee -a /etc/sysctl.conf
for vpn in /proc/sys/net/ipv4/conf/*; do echo 0 > $vpn/accept_redirects; echo 0 > $vpn/send_redirects; done
sysctl -p
Add this code to /etc/rc.local
for vpn in /proc/sys/net/ipv4/conf/*; do echo 0 > $vpn/accept_redirects; echo 0 > $vpn/send_redirects; done

iptables --table nat --append POSTROUTING --jump MASQUERADE
5. /etc/ipsec.conf
This is whole config. Just replace 192.168.0.166 to your IP and 192.168.0.1 to your router IP
version 2.0
config setup
nat_traversal=yes
protostack=netkey
virtual_private=%v4:192.168.0.0/16,%v4:10.0.0.0/8,%v4:172.16.0.0/12,%v4:25.0.0.0/8,%v4:!10.25$
oe=off
plutodebug=all
plutostderrlog=/var/log/openswan.log
conn L2TP-PSK-NAT
rightsubnet=vhost:%priv
also=L2TP-PSK-noNAT
conn L2TP-PSK-noNAT
authby=secret
pfs=no
auto=add
keyingtries=3

# we cannot rekey for %any, let client rekey
rekey=no

# Apple iOS doesn't send delete notify so we need dead peer detection
# to detect vanishing clients

dpddelay=30
dpdtimeout=120
dpdaction=clear

# Set ikelifetime and keylife to same defaults windows has

ikelifetime=8h
keylife=1h

# l2tp-over-ipsec is transport mode
type=transport
#
left=192.168.0.166
#
# For updated Windows 2000/XP clients,
# to support old clients as well, use leftprotoport=17/%any
leftprotoport=17/%any
#
# The remote user.
#
right=%any
# Using the magic port of "%any" means "any one single port". This is
# a work around required for Apple OSX clients that use a randomly
# high port.
rightprotoport=17/%any
#force all to be nat'ed. because of ios
forceencaps=yes

# Normally, KLIPS drops all plaintext traffic from IP's it has a crypted
# connection with. With L2TP clients behind NAT, that's not really what
# you want. The connection below allows both l2tp/ipsec and plaintext
# connections from behind the same NAT router.
# The l2tpd use a leftprotoport, so they are more specific and will be used
# first. Then, packets for the host on different ports and protocols (eg ssh)
# will match this passthrough conn.

conn passthrough-for-non-l2tp
type=passthrough
left=192.168.0.166
leftnexthop=192.168.0.1
right=0.0.0.0
rightsubnet=0.0.0.0/0

auto=route
6. /etc/ipsec.secrets
Just put your IP address and your secret here.
include /var/lib/openswan/ipsec.secrets.inc
192.168.0.166 %any: PSK "your_password_here"
7. /etc/xl2tpd/xl2tpd.conf
Put your IP here and set range that will not conflict with your router dhcp
[global]
ipsec saref = yes
listen-addr = 192.168.0.166
[lns default]
ip range = 192.168.0.201-192.168.0.250
local ip = 192.168.0.166
assign ip = yes
require chap = yes
refuse pap = yes
require authentication = yes
name = linkVPN
ppp debug = yes
pppoptfile = /etc/ppp/options.xl2tpd
length bit = yes
8. /etc/ppp/options.xl2tpd
This one you can just copy.
require-mschap-v2
ipcp-accept-local
ipcp-accept-remote
ms-dns 8.8.8.8
asyncmap 0
auth
crtscts
lock
idle 1800
mtu 1200
mru 1200
modem
debug
name l2tpd
proxyarp
lcp-echo-interval 30
lcp-echo-failure 4
nodefaultroute
connect-delay 5000
9. /etc/ppp/chap-secrets
Set your user and password here.
# Secrets for authentication using CHAP
# client server secret IP addresses
username * password *
10. Restart the service
/etc/init.d/xl2tpd restart
/etc/init.d/ipsec restart
And that is it. Make sure your VPN server starts on boot:
update-rc.d -f ipsec remove
update-rc.d ipsec defaults
Chose MS-Chap v2 when connecting
And put your IPsec secret here
On IOS 10
Important
Windows does not support IPsec NAT-T by default, which is used whenever the server is behind a NAT (as in this case). You have to add a registry key to enable this.
On your Windows Vista, 7 or 8 client machine change or add the following registry item:
HKEY_LOCAL_MACHINE\SYSTEM\CurrentControlSet\Services\PolicyAgent\

New DWORD (32-bit) Value:AssumeUDPEncapsulationContextOnSendRule
Set the value to 2
This allows the client or server to be behind a NAT firewall.