Plesk to HestiaCP migration
This is more reminder for me then step by step tutorial. Some basic knowledge is required. Or some advanced knowledge 🙂 depends. And focus is on mistakes I did, in order to not make them again.
Setup
Old server: CentOS managed by Plesk + Cloudflare DNS. 6 websites with some mail accounts. 5 wordpress sites and one phpbb forum. That’s all.
New server: Fresh installation of Debian 12, empty. No panel. Cloudflare DNS.
HestiaCP installation
Hestia needs full FQDN domain name. So something like host.mydomain.com and that domain name must match hostname. If it doesn’t match SSL lets Encrypt will not work. Hestia will generate self signed certificate instead of Lets Encrypt. Easy to fix, just change hostname to host.mydomain.com.
sudo hostnamectl set-hostname host.mydomain.com

### /etc/hosts
127.0.0.1   host.mydomain.com host
The other more important thing. Mail. Do not put any yahoo google mail during install. If it is required to put some mail, use your own domain mail. The thing is, Hestia will send notification on that mail, and without properly setup, so PTR (rDNS), DKIM, DMARC SPF1 your domain will be blacklisted for spam. Even when you setup everything right, it needs some time to regain reputation.
Installation is pretty easy. Go to https://hestiacp.com/install and just check features you need. In my case, no bind, multi php, sieve… etc
# download install script
wget https://raw.githubusercontent.com/hestiacp/hestiacp/release/install/hst-install.sh

# and run it
bash hst-install.sh --hostname 'host.mydomain.com' --username 'paneluser' --password 'myadminpass' --multiphp '7.4, 8.1, 8.3' --named no --sieve yes

# and follow, it will be a few prompts..
Now, in order to avoid downtime, the order of doing things is very important. When you have Hestia up and running, make users for all websites, make web space for all websites, make same email accounts, make databases for all websites. Transfer websites files and databases to right places. Plesk use /var/www/vhosts/mydomain.com/httpdocs. Hestia use /home/user/web/mydomain.com/public_html. Change database credentials in wp-config (it will be different in Hestia). Transfer all mails with imapsync. And then point your DNS to new server. Then add Let’s Encrypt from Hestia panel, for web and for mail. It is separate things. Cloudflare proxy must be turned off. After SSL is installed turn it on. After that, SPF1, DKIM DMARC, copy it from Hestia. You will find it in mail domain dns settings. PTR must be changed to mail.mydomain.com by your hosting provider. Or, login to your provider panel and search for PTR or RDNS. Change will take a while to take effect. At the end, your ip address must point to your domain. (reverse dns)
Transfer WEB sites content and databases
### on Plesk
### go to /var/www/vhosts/mydomain
zip -r mysite httpdocs
mysqldump --user=root -p my_db_name > my_db_name.sql

### transfer files via sftp or rsync

### on Hestia
### go to /home/user/web/mydomain.com/
### unzip to current folder
unzip mysite.zip -d .
sudo mariadb -u root -p -e "USE my_db_name; SOURCE /path/to/my_data_base.sql;"

### move original html_public with some generic files in it, then move httpdocs to public_html
mv public_html public_html_orig
mv httpdocs public_html

### permissions and ownership
### permissions are saved by zip but ownershio has to be set
chown -R hestia_user:hestia_group public_html

### if you have to set permissions manualy general rules for wordpress is 755 for folders, 644 for files, 600 for .htaccess and wp-config.php. But it could vary from case to case
And the moment of truth. Point DNS to new IP address. All web sites worked like a charm. All but one. That one: SERVER ERROR 500. I spent all night on this. So, all sites was copied from hosting to hosting like I described above. But not this one. Plesk installed wordpress for this one. After searching the logs, it appears that there is hard coded path to wordfence plugin. Plesk path was /var/www/vhosts/domain…etc. And Hestia path is different. Deleting the plugin has no effect, disabling .htaccess also. Long story short, it is in root of website in .user.ini. Just delete it.
MAIL migration
This is easy, once you have imapsync installed. Debian 12? apt install imapsync? nope… so
sudo apt install cpanminus -y
sudo cpanm Mail::IMAPClient JSON::WebToken::Crypt::RSA
sudo cpanm imapsync

### missing modules?

sudo apt update
sudo apt install git make perl libmail-imapclient-perl libdigest-hmac-perl \
libterm-readkey-perl libio-socket-ssl-perl libio-tee-perl libfile-copy-recursive-perl \
libauthen-ntlm-perl libjson-webtoken-perl libcrypt-openssl-rsa-perl \
libsys-meminfo-perl libunicode-string-perl liburi-perl -y

cd /usr/local/src
sudo git clone https://github.com/imapsync/imapsync.git
cd imapsync
sudo make all
### if there are no errors
sudo make install

### if „rlog not found / error 127” ?
sudo apt install rcs -y

cd /usr/local/src/imapsync
sudo make all
sudo make install

### if rcsdiff: RCS/imapsync,v: No such file or directory make: *** [Makefile:107: VERSION] Error 2

cd /usr/local/src/imapsync
### copy script to the path
sudo install imapsync /usr/local/bin/

### if Can't locate Encode/IMAPUTF7.pm in @INC (you may need to install the Encode::IMAPUTF7 module)

apt install libencode-imaputf7-perl -y
apt install libfile-tail-perl -y
That was about installing imapsync on Debian 12. Now test connection. DNS still points to old server. For new server just use ip address.
imapsync \
--host1 mail.old-server.com --user1 [email protected] --password1 'old_password' \
--host2 123.123.123.123 --user2 [email protected] --password2 'new_password' \
--justconnect
If it’s ok, start sync. It can take a while depends on how big are mail boxes.
imapsync \
--host1 mail.old-server.com --user1 [email protected] --password1 'old_password' \
--host2 <IP_address_of_new_server> --user2 [email protected] --password2 'new_password' \
--automap --addheader --nofoldersizes --skipsize --useheader 'Message-ID'
Then, email clients on iphone and ipads. You can not change passwords before you change DNS. Once you change DNS, fail2ban will ban your IP if mail clients try to connect with old password. Get them off line. Install ssl from Hestia panel for mail. Copy dns records to Cloudflare, dkim, dmarc, spf, domain_key. Do not forget to check PTR. And then reconnect mail clients
PTR points to just one mail domain. For multiple mail domains use:
v=spf1 a mx include:mail.firstdomain.com -allSpamAssassin + Bayes – learn from spam folder
nano /etc/spamassassin/local.cf

### copy this on the beggining of the local.cf

bayes_auto_learn 1
use_bayes 1
bayes_path /var/spamassassin/bayes
bayes_auto_learn_threshold_spam 6.0
bayes_auto_learn_threshold_nonspam 0.1

### restart service

systemctl restart spamd

### make folder if doesn't exist
mkdir -p /var/spamassassin
chown -R debian-spamd:debian-spamd /var/spamassassin
### OR chown -R hestia_user:mail /var/spamassassin (just for one user)

### from this moment, when you move mail as spam
### Hestia can start sa-learn script

### make bayes databes if does not exist
mkdir -p /var/lib/spamassassin/.spamassassin
chown -R debian-spamd:debian-spamd /var/lib/spamassassin/.spamassassin
chmod -R 700 /var/lib/spamassassin/.spamassassin
So, some files and folders to make, and permissions to set. I made a script that should check for missing files, make them and set permissions and then execute sa-learn for all mail boxes for spam and ham. It needs to collect at least 200 mails for spam and hame before it starts to work.
#!/bin/bash
# learn-spam-all.sh
# Version: PRO
# Runs sa-learn for multiple mailboxes: learns both spam and ham for each entry.
# Run as root (cron or manually). Log: /var/log/sa-learn-all.log
# If you don’t want the script to adjust permissions, set FIX_PERMS=false

set -euo pipefail

LOGFILE="/var/log/sa-learn-all.log"
BAYES_DIR="/var/spamassassin"
KEEP_DAYS=30
DATEFMT='+%Y-%m-%d %H:%M:%S'
FIX_PERMS=true   # set to false if you don’t want permission changes

# ------------------------------------------------------------------
# CONFIGURATION — each line: user domain mailbox
# Example:
#   "user1 mydomain1.com mailbox1"
#   "user2 mydomain2.com mailbox2"
#   "user3 mydomain3.com mailbox3"
# ------------------------------------------------------------------
MAILBOXES=(
   "user1 mydomain1.com mailbox1"
   "user2 mydomain2.com mailbox2"
   "user3 mydomain3.com mailbox3"
)
# ------------------------------------------------------------------

echo "[$(date "$DATEFMT")] INFO: Starting learn-spam-all run" | tee -a "$LOGFILE"

# Check if sa-learn is available
if ! command -v sa-learn >/dev/null 2>&1; then
  echo "[$(date "$DATEFMT")] ERROR: sa-learn not found on PATH" | tee -a "$LOGFILE"
  exit 1
fi

# Ensure /var/spamassassin exists
mkdir -p "$BAYES_DIR"

# Optional permissions fix (safe — changes owner/group/perms, never deletes)
if [ "$FIX_PERMS" = true ]; then
  echo "[$(date "$DATEFMT")] INFO: Applying Bayes permissions fix to $BAYES_DIR" | tee -a "$LOGFILE"
  # Change owner to mkdnews:mail (adjust if you want another owner)
  chown -R mkdnews:mail "$BAYES_DIR" 2>/dev/null || true
  # SGID on directory
  chmod 2770 "$BAYES_DIR" 2>/dev/null || true
  # Files 660, directories 770
  find "$BAYES_DIR" -type f -exec chmod 660 {} \; 2>/dev/null || true
  find "$BAYES_DIR" -type d -exec chmod 770 {} \; 2>/dev/null || true
  # Apply ACLs if available (default group rwX)
  if command -v setfacl >/dev/null 2>&1; then
    setfacl -R -m g:mail:rwX "$BAYES_DIR" 2>/dev/null || true
    setfacl -R -d -m g:mail:rwX "$BAYES_DIR" 2>/dev/null || true
  fi
else
  echo "[$(date "$DATEFMT")] INFO: Skipping permission fixes (FIX_PERMS=false)" | tee -a "$LOGFILE"
fi

# Helper: tries to locate spam paths and ham paths
find_spam_path() {
  local user="$1" domain="$2" box="$3"
  candidates=(
    "/home/${user}/mail/${domain}/${box}/.Spam/cur"
    "/home/${user}/mail/${domain}/${box}/.Junk/cur"
    "/home/${user}/mail/${domain}/${box}/Spam/cur"
    "/home/${user}/mail/${domain}/${box}/.spam/cur"
  )
  for p in "${candidates[@]}"; do
    [ -d "$p" ] && { printf '%s' "$p"; return 0; }
  done
  return 1
}

find_ham_path() {
  local user="$1" domain="$2" box="$3"
  candidates=(
    "/home/${user}/mail/${domain}/${box}/cur"
    "/home/${user}/mail/${domain}/${box}/Inbox/cur"
    "/home/${user}/mail/${domain}/${box}/INBOX/cur"
    "/var/mail/${user}"
    "/home/${user}/Maildir/cur"
  )
  for p in "${candidates[@]}"; do
    [ -d "$p" ] && { printf '%s' "$p"; return 0; }
  done
  return 1
}

# Main loop: for each entry, attempt spam then ham learning
for entry in "${MAILBOXES[@]}"; do
  read -r USER DOMAIN BOX <<< "$entry"

  if ! id "$USER" &>/dev/null; then
    echo "[$(date "$DATEFMT")] WARN: user $USER does not exist, skipping" | tee -a "$LOGFILE"
    continue
  fi

  echo "[$(date "$DATEFMT")] INFO: Processing $USER@$DOMAIN/$BOX" | tee -a "$LOGFILE"

  # --- SPAM ---
  if spam_path=$(find_spam_path "$USER" "$DOMAIN" "$BOX"); then
    echo "[$(date "$DATEFMT")] INFO: Found spam path: $spam_path" | tee -a "$LOGFILE"
    echo "[$(date "$DATEFMT")] INFO: Running sa-learn --spam as $USER ..." | tee -a "$LOGFILE"
    OUTPUT=$(sudo -u "$USER" -H sa-learn --spam "$spam_path" --dbpath "$BAYES_DIR" 2>&1 || true)
    echo "$OUTPUT" | tee -a "$LOGFILE"
  else
    echo "[$(date "$DATEFMT")] NOTICE: No spam folder found for $USER@$DOMAIN/$BOX" | tee -a "$LOGFILE"
  fi

  # --- HAM ---
  if ham_path=$(find_ham_path "$USER" "$DOMAIN" "$BOX"); then
    echo "[$(date "$DATEFMT")] INFO: Found ham path: $ham_path" | tee -a "$LOGFILE"
    echo "[$(date "$DATEFMT")] INFO: Running sa-learn --ham as $USER ..." | tee -a "$LOGFILE"
    OUTPUT=$(sudo -u "$USER" -H sa-learn --ham "$ham_path" --dbpath "$BAYES_DIR" 2>&1 || true)
    echo "$OUTPUT" | tee -a "$LOGFILE"
  else
    echo "[$(date "$DATEFMT")] NOTICE: No ham folder found for $USER@$DOMAIN/$BOX" | tee -a "$LOGFILE"
  fi

  # Summary: dump magic
  SUMMARY=$(sudo -u "$USER" -H sa-learn --dbpath "$BAYES_DIR" --dump magic 2>/dev/null || true)
  echo "$SUMMARY" | grep -E "nspam|nham|ntokens" | tee -a "$LOGFILE" || true

  echo "[$(date "$DATEFMT")] INFO: Completed $USER@$DOMAIN/$BOX" | tee -a "$LOGFILE"
  echo "------------------------------------------------------------" | tee -a "$LOGFILE"
done

# Rotate old logs (KEEP_DAYS)
find /var/log -name "sa-learn-all.log*" -mtime +"${KEEP_DAYS}" -exec rm -f {} \; 2>/dev/null || true

echo "[$(date "$DATEFMT")] INFO: Full run finished." | tee -a "$LOGFILE"
exit 0
If works, put to cron
crontab -e
### put line ###
0 3 * * * /usr/local/bin/learn-spam.sh
Mail debug
I had an situation. Mail loop. Deleting the spam folder, but all mails reappears after few seconds. Problem from Plesk setup, different name for spam folder. Here is junk folder
cd /home/USERNAME/mail/mydomain.com/mail/
systemctl stop dovecot
rm -f dovecot.index* maildirsize
systemctl start dovecot
rm -rf /var/lib/roundcube/temp/*
rm -rf /var/lib/roundcube/cache/*

ls -lh new cur
find . -type f -size 0
find . -type f -size 0 -delete
rm -f dovecot.index* dovecot-uidlist dovecot-keywords


systemctl restart dovecot

### mark as spam
nano /etc/exim4/spam-block.conf

### add to file
# Enable SpamAssassin headers
warn  spam = Debian-exim:true
      add_header = X-Spam-Score: $spam_score_int
      add_header = X-Spam-Flag: $spam_score_int :Gte: 50 :?YES:?NO
      add_header = X-Spam-Report: $spam_report

# Tag message subject if spam
warn  spam = Debian-exim:true
      condition = ${if >{$spam_score_int}{50}{true}{false}}
      add_header = Subject: *****SPAM***** $h_Subject:

systemctl restart exim4

### put spam to junk
mkdir -p /etc/dovecot/sieve
nano /etc/dovecot/sieve/global-spamfilter.sieve
### put the same

require ["fileinto", "mailbox"];

# Ako header sadrži SPAM oznaku, prebaci u Junk
if header :contains "X-Spam-Flag" "YES" {
    fileinto "Junk";
    stop;
}

# Ako subject ima *****SPAM*****, takođe u Junk
if header :contains "Subject" "*****SPAM*****" {
    fileinto "Junk";
    stop;
}

### save
### compile

sievec /etc/dovecot/sieve/global-spamfilter.sieve

### install if missing
apt install dovecot-sieve dovecot-managesieved -y


/etc/dovecot/conf.d/90-sieve.conf
### put this line
sieve_before = /etc/dovecot/sieve/

### restart dovecot
systemctl restart dovecot

### permissions
chown -R vmail:vmail /home/user/mail/mydomain.com/info/sieve
chmod 750 /home/user/mail/mydomain.com/info/sieve
systemctl restart dovecot

### then I have problem with this conf
/etc/exim4/dnsbl.conf
### where zen.spamhouse was blocking everything (delete all content, leave empty file)
SSL Let’s Encrypt Renew
Hestia renews SSL certificate automatically, but it has problem to do it if Cloudflare proxy is ON. And it is on for security reasons all the time. I tried several different approaches and…. acme script directly over Cloudflare API – everything was working for WEB domains, nothing was working for MAIL domains. At the end I found some bugs in v-add-mail-domain-ssl, v-rebuild-mail-domain, v-change-mail-domain-sslcert. (or I didn’t understand how to use those commands). No errors reported but Hestia doesn’t see new mail certificate. So, the only command that actually works for mail is v-add-letsencrypt-domain if you put “” yes at the end. (empty string for aliases, yes for mail). And it will affect only mail domain. Otherwise it will affect WEB only.
This Script will connect Cloudflare via API. Turn-off proxy. Wait and check when proxy is turned off. Issue new certificate for web and mail. Turn on proxy.
#!/bin/bash

DOMAIN="mydomain.com"
USER="myuser"

echo "=== Cloudflare proxy kontrola za $DOMAIN ==="

# 1️⃣ Gasi proxy (ovde dodaj svoju komandu)
echo "[1/4] Gasim Cloudflare proxy..."

# Cloudflare proxy OFF
CF_API_TOKEN="Cloudflare_API_token_here"
ZONE_ID="Cloudflare_ID_ZONE_here"
DOMAIN="mydomain.com"
RECORDS=("" "www" "webmail")

for record in "${RECORDS[@]}"; do
  [ -z "$record" ] && name="$DOMAIN" || name="$record.$DOMAIN"
  echo "➡️ Gasi proxy za $name..."
  id=$(curl -s -X GET "https://api.cloudflare.com/client/v4/zones/$ZONE_ID/dns_records?name=$name" \
       -H "Authorization: Bearer $CF_API_TOKEN" \
       -H "Content-Type: application/json" | jq -r '.result[0].id // empty')

  [ -z "$id" ] && echo "⚠️ Nije pronađen DNS zapis za $name" && continue

  curl -s -X PATCH "https://api.cloudflare.com/client/v4/zones/$ZONE_ID/dns_records/$id" \
       -H "Authorization: Bearer $CF_API_TOKEN" \
       -H "Content-Type: application/json" \
       --data '{"proxied": false}' >/dev/null

  echo "✅ Proxy isključen za $name"
done

# 2️⃣ Cekaj dok Cloudflare stvarno ne nestane iz HTTP odgovora
echo "[2/4] Proveravam da li je Cloudflare iskljucen..."
MAX_WAIT=120   # maksimalno cekaj 2 minuta
INTERVAL=5     # proverava svakih 5 sekundi
elapsed=0

while ((elapsed < MAX_WAIT)); do
    SERVER_HEADER=$(curl -sI "https://$DOMAIN" | grep -i "server:" | tr -d '\r')
    if [[ "$SERVER_HEADER" =~ "cloudflare" ]]; then
        echo " ⏳ Cloudflare jos aktivan ($SERVER_HEADER)... cekam..."
        sleep $INTERVAL
        ((elapsed+=INTERVAL))
    else
        echo " ✅ Cloudflare proxy iskljucen ($SERVER_HEADER)"
        break
    fi
done

if ((elapsed >= MAX_WAIT)); then
    echo " ⚠️ Upozorenje: Cloudflare se nije iskljucio ni posle $MAX_WAIT sekundi."
    echo "     Mozda DNS jos uvek pokazuje na proxy IP."
    echo "     Nastavljam ipak sa Let's Encrypt pokusajem..."
fi

# 3️⃣ Pokreni Let's Encrypt izdavanje sertifikata.... ovo "" yes je za mail domain samo
echo "[3/4] Pokrecem izdavanje Let's Encrypt sertifikata..."
sudo /usr/local/hestia/bin/v-add-letsencrypt-domain "$USER" "$DOMAIN" "" yes
sudo /usr/local/hestia/bin/v-add-letsencrypt-domain "$USER" "$DOMAIN"
LE_STATUS=$?

if [[ $LE_STATUS -eq 0 ]]; then
    echo " ✅ Sertifikati uspesno izdati za $DOMAIN!"
else
    echo " ❌ Greska prilikom izdavanja sertifikata (exit code $LE_STATUS)."
    echo "     Proveri log: /usr/local/hestia/log/letsencrypt.log"
fi

# Cloudflare proxy ON mydomain.com
CF_API_TOKEN="Cloudflare_API_TOKEN_here"
ZONE_ID="Cloudflare_ZONE_ID_here"
DOMAIN="mydomain.com"
RECORDS=("" "www" "webmail")

for record in "${RECORDS[@]}"; do
  [ -z "$record" ] && name="$DOMAIN" || name="$record.$DOMAIN"
  echo "➡️ Pali proxy za $name..."
  id=$(curl -s -X GET "https://api.cloudflare.com/client/v4/zones/$ZONE_ID/dns_records?name=$name" \
       -H "Authorization: Bearer $CF_API_TOKEN" \
       -H "Content-Type: application/json" | jq -r '.result[0].id // empty')

  [ -z "$id" ] && echo "⚠️ Nije pronađen DNS zapis za $name" && continue

  curl -s -X PATCH "https://api.cloudflare.com/client/v4/zones/$ZONE_ID/dns_records/$id" \
       -H "Authorization: Bearer $CF_API_TOKEN" \
       -H "Content-Type: application/json" \
       --data '{"proxied": true}' >/dev/null

  echo "✅ Proxy uključen za $name"
done

echo "[4/4] Gotovo!"
protect PHPMYADMIN with Cloudflare ZeroTrust
ZeroTrust > access > applications > add an application
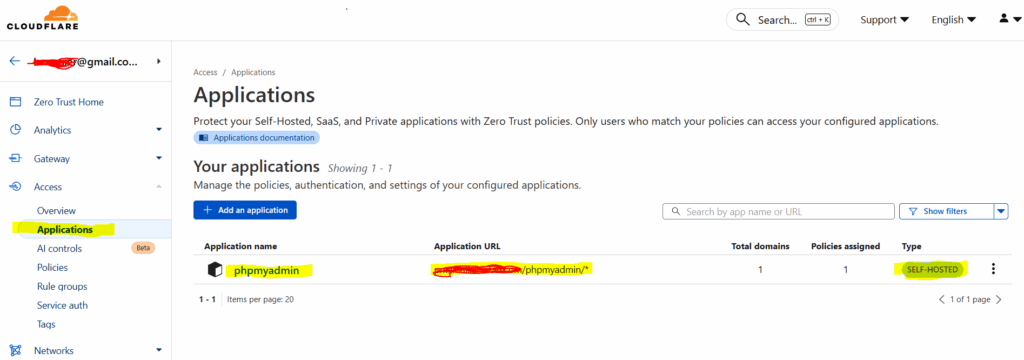

ZeroTrust > access > policies > add a policy

ZeroTrust > settings > authentication > Login methods > one-time PIN

ZeroTtust > access > applications > policies > select existing policies

ZeroTrust > settings > authentication > app launcher > manage > select existing plicies


Limit PHPMYADMIN to just one URL
sudo nano /etc/apache2/conf.d/phpmyadmin.inc

### paste under:
### <Directory /usr/share/phpmyadmin>
### Options SymLinksIfOwnerMatch
### DirectoryIndex index.php

<If "%{HTTP_HOST} != 'myhost.mydomain.com'">
        Require all denied
</If>


#### and then
sudo apachectl configtest
sudo systemctl reload apache2
rclone > gdrive (backups)
apt install rclone ## debian will install old version v1.60.1-DEV
curl https://rclone.org/install.sh | bash    ### this will install latest

rclone config

n) New remote
name> gdrive
type> drive
Scope> 1   # (full access)

Use auto config? (y/n) # NO....or Advanced config → n....“Edit the config manually?” yeap

Go to the following link: https://accounts.google.com/o/oauth2/auth?client_id=...
### copy link to browser
### Google will reply with auth code. Paste it back to terminal

rclone lsd gdrive:

rclone copy /backup/ gdrive:/test-backup/ --progress
Secure /wp-admin with Cloudflare managed challenge
In domain menu: security > security rules > create rule > custom rule

### Rule name (required)
wp-login protect

### When incoming requests match…
(http.request.uri.path contains "/wp-login.php" or http.request.uri.path contains "/wp-admin")

Then take action…
Managed Challenge

### Rule name
xmlrpc block

### When incoming requests match…
http.request.uri.path contains "/xmlrpc.php"

Then take action…
Block

SSHD – sftp config bug
nano /etc/ssh/sshd_config

# override default of no subsystems
Subsystem sftp internal-sftp   ### instead of sftp-server
DB root pass reset
Do not put #$@#$ in password in mysql cli. Yeap, I locked root password
sudo systemctl stop mariadb
sudo mariadbd --skip-grant-tables --skip-networking &

sudo mariadb

FLUSH PRIVILEGES;
ALTER USER 'root'@'localhost' IDENTIFIED BY 'New_password';
FLUSH PRIVILEGES;
EXIT;

sudo pkill -f mariadbd
sudo systemctl start mariadb
Tags: cloudflare, hestiacp, migration, plesk, securityrules, zerotrust
Leave a Reply